
I've got 3 Christmas themed projects today featuring some of the new goodies we got in store this week.
Firstly, I just couldn't wait to get my hands on the new cover plate die from My Favorite Things - the Snow Drifts die is just perfect for paper piecing and I can see me using it all year round not just for snow scenes as I can see waves too!

I cut it from white card and mounted it onto an Avery Elle base card in soft grey. Then used patterned paper from the new Calm & Cozy Chevron pad to piece in between ombre style. I added the cute little girl pulling her tree home over hills - another MFT stamp called Sending You A Little Christmas - she is coloured with pencils and fussy cut out making sure the sledge is on the hill. (You could add the same character sledging instead using the newly released Dashing By) The sentiment is from another new released stamp Joyous Christmas Sentiments which is going to feature on a lot of my cards this Christmas as I love the bold fun fonts - they really make a statement!
Now, if you need to make a lot of Christmas cards fast then I think Lil' Inker Designs have come up with a winning formula this year! I love their version of Merry & Bright in die form. This card took less than 2 minutes to come together.
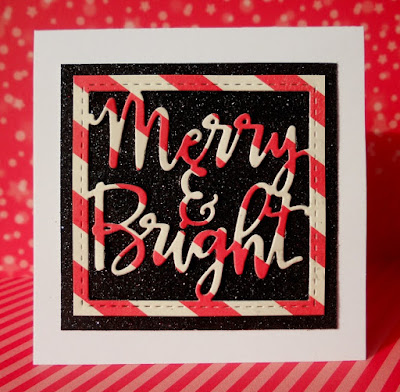
Simply die cut the boxed sentiment from your favourite holiday papers - here I used a square of candy cane stripes from my stash - you could go straight to your card but I wanted to add a little glamour so mounted it onto some bold black glitter paper. This die has lots of possibilities - shaker cards, gift tags - you can even trim the words out from the frame with 6 quick snips and use it as a standalone sentiment.
For my last project, I've been playing with another item from the Lil' Inker Designs release - the Make a Santa Stamp and Die Bundle. This is a hat, beard, moustache and boots die set designed to work with their treat holder die but I wanted to show that you can make a full Santa from it quite easily too!

To make the Santa you need a couple of extra items - a circle die to make his face and something to make his body. The Hey Foxy Die has the perfect body but if you don't have that you could use an oval and crop it. Simply die cut using red, white and black card and assemble - stamping the eyes and mouth using the stamps which are part of the bundle. For the mittens, I used the boots die and trimmed off the bottoms, sticking them behind to create his thumbs. I popped him on a large tag die cut from kraft which was repeat stamped using a couple of stamps from the bundle. The tag set I used is currently out of stock but we have a lot of tag dies to choose from.
NEWS FROM THE STORE:
We will have a few more arrivals next week:
That's all this week - Happy Crafting!
Tara
x


Firstly, I just couldn't wait to get my hands on the new cover plate die from My Favorite Things - the Snow Drifts die is just perfect for paper piecing and I can see me using it all year round not just for snow scenes as I can see waves too!

I cut it from white card and mounted it onto an Avery Elle base card in soft grey. Then used patterned paper from the new Calm & Cozy Chevron pad to piece in between ombre style. I added the cute little girl pulling her tree home over hills - another MFT stamp called Sending You A Little Christmas - she is coloured with pencils and fussy cut out making sure the sledge is on the hill. (You could add the same character sledging instead using the newly released Dashing By) The sentiment is from another new released stamp Joyous Christmas Sentiments which is going to feature on a lot of my cards this Christmas as I love the bold fun fonts - they really make a statement!
Now, if you need to make a lot of Christmas cards fast then I think Lil' Inker Designs have come up with a winning formula this year! I love their version of Merry & Bright in die form. This card took less than 2 minutes to come together.

Simply die cut the boxed sentiment from your favourite holiday papers - here I used a square of candy cane stripes from my stash - you could go straight to your card but I wanted to add a little glamour so mounted it onto some bold black glitter paper. This die has lots of possibilities - shaker cards, gift tags - you can even trim the words out from the frame with 6 quick snips and use it as a standalone sentiment.
For my last project, I've been playing with another item from the Lil' Inker Designs release - the Make a Santa Stamp and Die Bundle. This is a hat, beard, moustache and boots die set designed to work with their treat holder die but I wanted to show that you can make a full Santa from it quite easily too!

To make the Santa you need a couple of extra items - a circle die to make his face and something to make his body. The Hey Foxy Die has the perfect body but if you don't have that you could use an oval and crop it. Simply die cut using red, white and black card and assemble - stamping the eyes and mouth using the stamps which are part of the bundle. For the mittens, I used the boots die and trimmed off the bottoms, sticking them behind to create his thumbs. I popped him on a large tag die cut from kraft which was repeat stamped using a couple of stamps from the bundle. The tag set I used is currently out of stock but we have a lot of tag dies to choose from.
NEWS FROM THE STORE:
We will have a few more arrivals next week:
- Reverse Confetti's Christmas Release
- Mama Elephant's 3rd Birthday Mega Release full of Christmas goodies
- Newton's Nook Christmas Release plus restocks
- Altenew's latest ink and die release plus restocks
That's all this week - Happy Crafting!
Tara
x


1 comment:
Lovely cards, Tara! I watched your first Periscope! Congratulations! What a great idea with the fox body to create the Santa! Have a lovely Sunday! x
Post a Comment